Irys
Encrypting onchain storage
Use Irys with Lit Protocol to store your encrypted data onchain.
Objectives
When you finish this guide, you should be able to:
- Encrypt data using Lit Protocol.
- Establish a set of rules determining who can decrypt the data.
- Store encrypted data onchain using Irys.
- Decrypt data using Lit Protocol.
Why This Matters
Using Lit with Irys empowers developers with the ability to create innovative applications by combining secure, encrypted data with the power of data storage and execution.
What is Irys?
Irys is a programmable L1 datachain that powers both data storage and execution. Irys is built to store, retrieve, and process datasets of any size with minimal latency.
Irys makes it easy to store your data onchain by supporting payments with most popular tokens. With a single upfront payment, you can upload data, which is guaranteed to be retrievable for a duration you set at the upload time—whether temporary or permanent.
Data on Irys is fully verifiable; you can inspect the blockchain at any time and verify what data was posted, when, and where it's located in Irys’s data ledgers.
Once encrypted, data can be uploaded onchain to Irys. Only users who meet the defined decryption rules can access the data, making it ideal for secure and private use cases.
Unlocking New Possibilities For Developers
This opens up new use cases for builders, such as:
- Gating access to content
- Storing and securing private DePIN data
- Securely archiving sensitive AI data
- Encrypted content for decentralized social apps
- Decentralized identity verification
- Creating private data marketplaces
- Creating exclusive NFTs
Encrypting Data
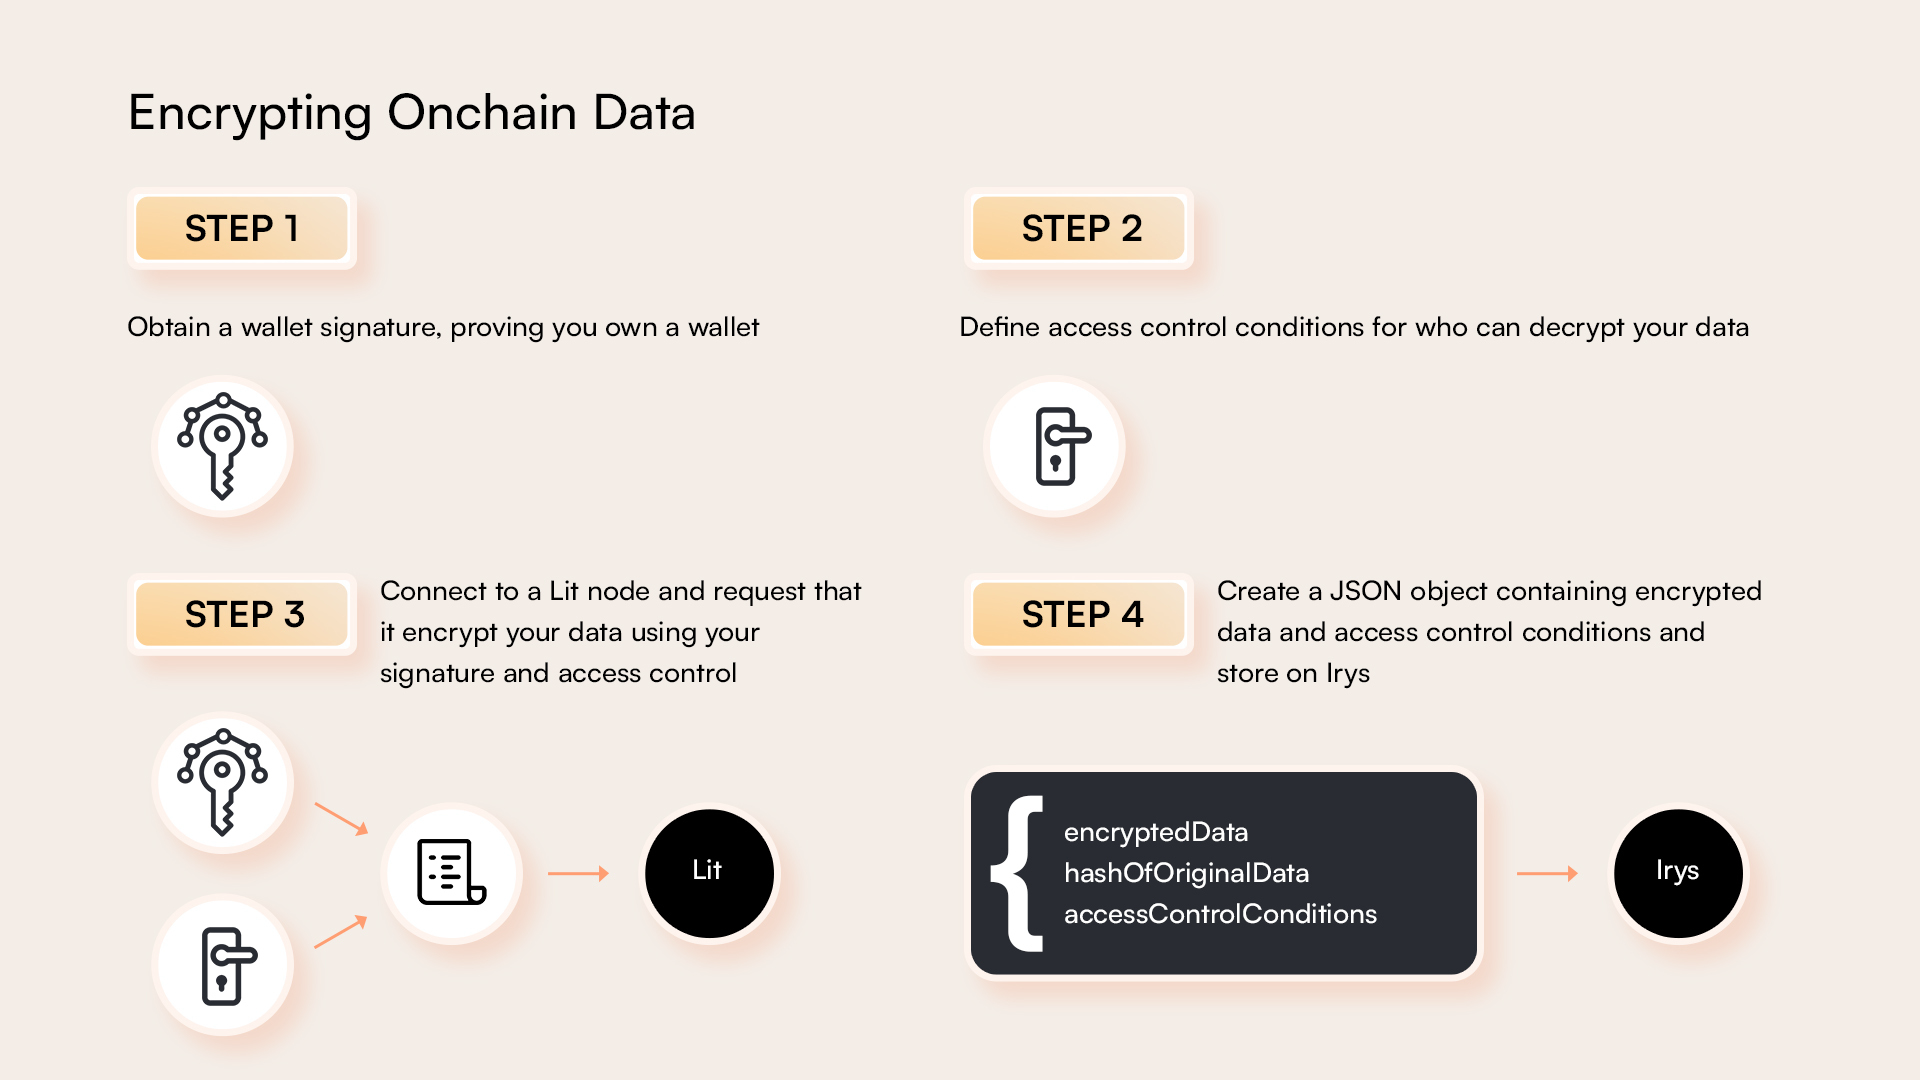
There are three steps to encrypting data:
- Obtain a wallet signature (AuthSig), which proves you own a wallet
- Define access control conditions for who can decrypt your data
- Connect to a Lit node and request that it encrypt your data
Decrypting Data
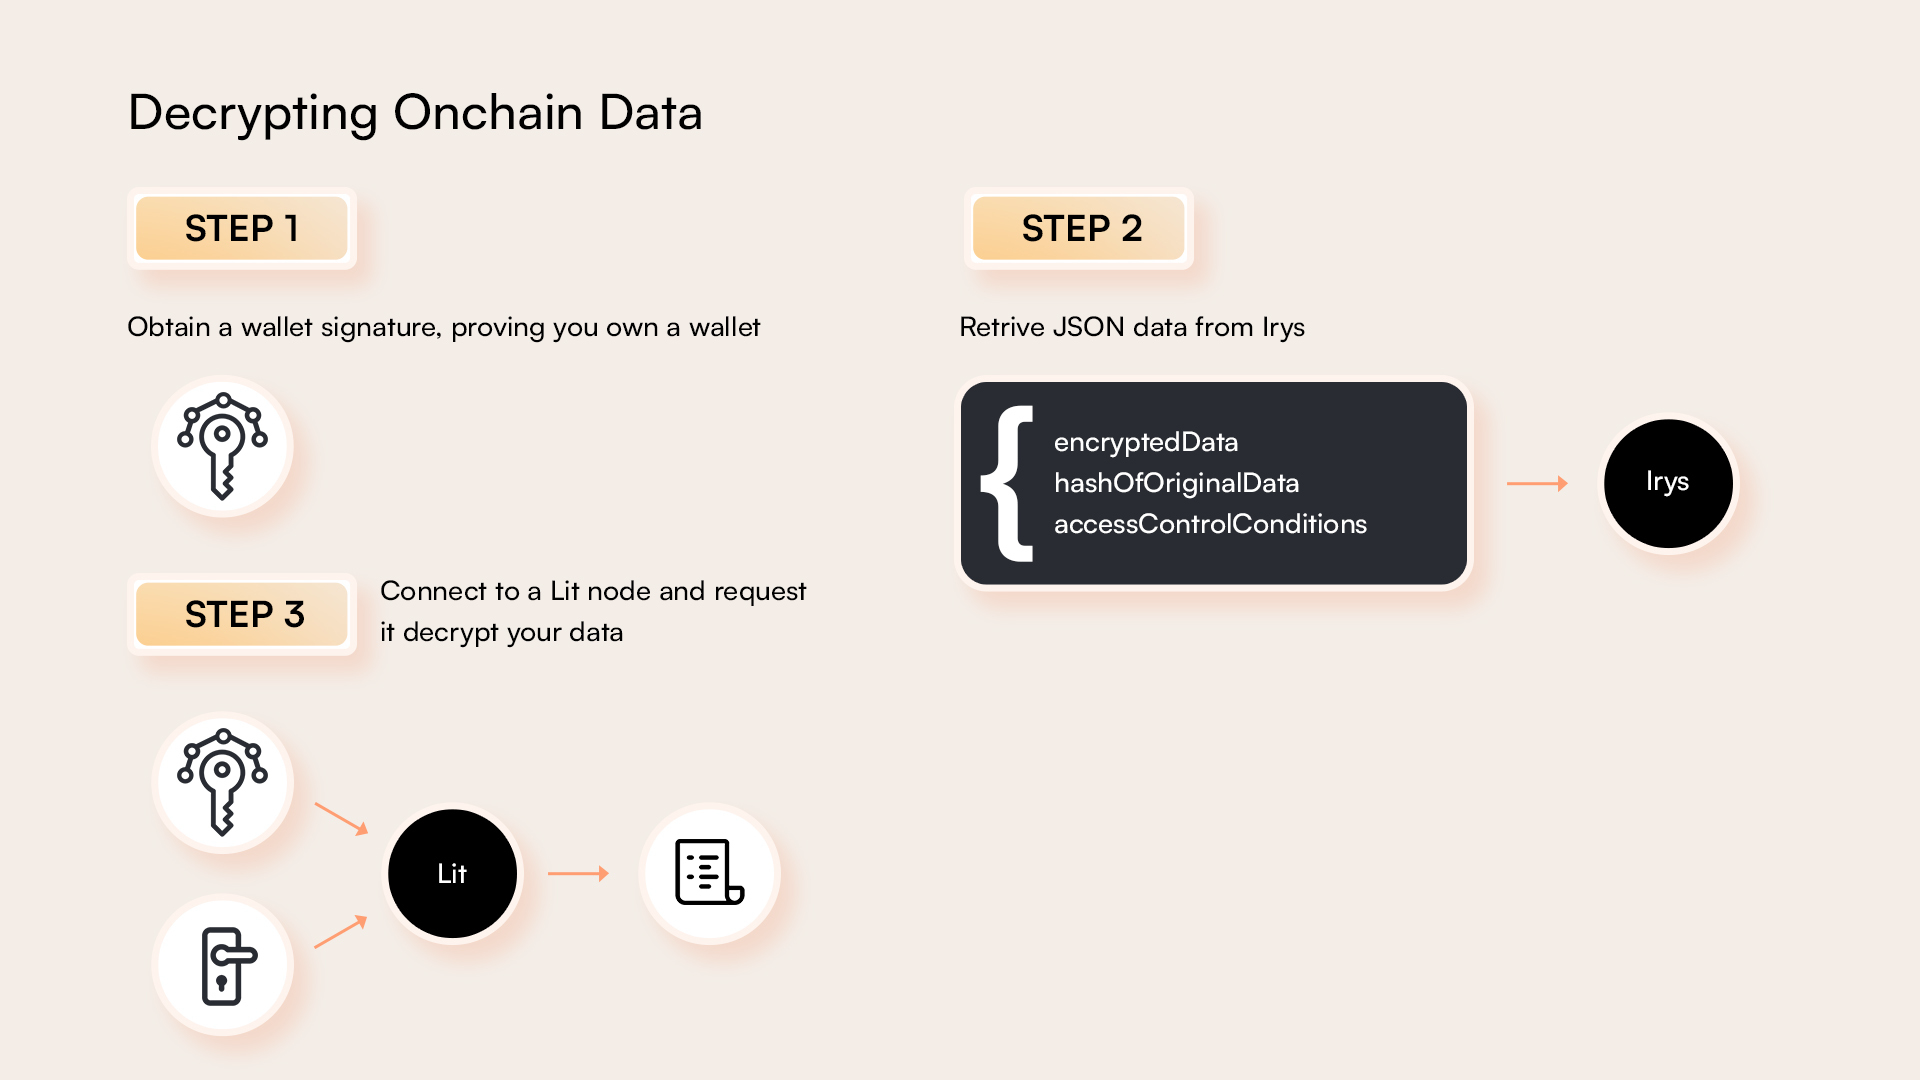
There are three steps to decrypting data:
- Obtain a wallet signature (AuthSig), which proves you own a wallet
- Retrieve data stored on Irys
- Connect to a Lit node and request that it decrypt your data
Examples
This guide covers integrating Lit with Irys, both with Node.js on the server and React/Next.js in the browser.
Node.js
When working with Node.js, provide a private key when encrypting and decrypting data.
The full code for this example is available in the GitHub repository. Users who prefer learning by example can start there.
Installing
npm install \
  @lit-protocol/lit-node-client-nodejs \
  @lit-protocol/constants \
  @irys/upload \
  @irys/upload-ethereum \
  ethers \
  siwe \
  dotenv
Connecting to Lit Protocol
Connect to a Lit node on one of our active networks. Choose between Datil (mainnet), Datil-test (testnet), and Datil-dev (development). For this example, we'll use DatilDev as use is free and not rate-limited.
import * as LitJsSdk from "@lit-protocol/lit-node-client-nodejs";
import { LIT_NETWORK } from "@lit-protocol/constants";

let litNodeClientInstance: LitJsSdk.LitNodeClientNodeJs | null = null;

async function getLitNodeClient(): Promise<LitJsSdk.LitNodeClientNodeJs> {
  if (litNodeClientInstance) return litNodeClientInstance;

  litNodeClientInstance = new LitJsSdk.LitNodeClientNodeJs({
    alertWhenUnauthorized: false,
    litNetwork: LIT_NETWORK.DatilDev, // DatilDev network for free usage
    debug: false,
  });

  await litNodeClientInstance.connect();
  return litNodeClientInstance;
}
Setting Access Control Rules
Access control rules determine who can decrypt your data. Set conditions based on criteria like ETH or ERC20 balance, NFT ownership, or custom logic.
// Allow users with ≥ 0 ETH:
function getAccessControlConditions(): object[] {
  return [
    {
      contractAddress: "",
      standardContractType: "",
      chain: "ethereum",
      method: "eth_getBalance",
      parameters: [":userAddress", "latest"],
      returnValueTest: {
        comparator: ">=",
        value: "000000000000000000", // 0 ETH in wei
      },
    },
  ];
}
// Allow users with ≥ 100 DAI:
function getAccessControlConditions(): object[] {
  return [
    {
      contractAddress: "0x6B175474E89094C44Da98b954EedeAC495271d0F", // DAI contract
      standardContractType: "ERC20",
      chain: "ethereum",
      method: "balanceOf",
      parameters: [":userAddress"],
      returnValueTest: {
        comparator: ">=",
        value: "100000000000000000000", // 100 DAI in wei
      },
    },
  ];
}
// Allow users owning any NFT from a contract
function getAccessControlConditions(): object[] {
 return [
   {
     contractAddress: "0xABC123...XYZ", // ERC721 contract address
     standardContractType: "ERC721",
     chain: "ethereum",
     method: "balanceOf",
     parameters: [":userAddress"],
     returnValueTest: {
       comparator: ">",
       value: "0",
     },
   },
 ];
}
For more advanced examples, see unified access control conditions.
Encrypting Data
We provide multiple methods to encrypt data, including strings, files, zip files.
encryptString():Encrypts a string.encryptFile(): Encrypts a file.encryptUint8Array(): Encrypts a Uint8Array, which can be a compressed file.encryptToJson(): Encrypts a string or file and serializes the result to JSON.
We will use encryptString() to encrypt a simple string:
async function encryptData(dataToEncrypt: string): Promise<[string, string]> {
  const authSig = await getAuthSig();
  const accessControlConditions = getAccessControlConditions();
  const litNodeClient = await getLitNodeClient();

  const { ciphertext, dataToEncryptHash } = await LitJsSdk.encryptString(
    { accessControlConditions, dataToEncrypt },
    litNodeClient
  );

  return [ciphertext, dataToEncryptHash];
}
The encryptString() function encrypts your data according to the specified access control conditions, and returns:
ciphertext: The encrypted string.dataToEncryptHash: The hash of the original string, ensuring data integrity.
Storing Data on Irys
When storing encrypted data on Irys, store it as a JSON object with three components:
ciphertext: The encrypted version of your data.dataToEncryptHash: A hash of the original data, which helps verify its integrity during decryption.accessControlConditions: The rules governing who can decrypt the data.
Start by connecting to Irys:
The following code is for using Ethereum only, Irys also has examples covering all supported tokens.
import { Uploader } from "@irys/upload";
import { Ethereum } from "@irys/upload-ethereum";

const getIrysUploader = async () => {
  const irysUploader = await Uploader(Ethereum).withWallet(process.env.PRIVATE_KEY);
  return irysUploader;
};
Then upload your JSON object:
async function storeOnIrys(cipherText: string, dataToEncryptHash: string): Promise<string> {
  const irysUploader = await getIrysUploader();

  const dataToUpload = {
    cipherText,
    dataToEncryptHash,
    accessControlConditions: getAccessControlConditions(),
  };

  try {
    const tags = [{ name: "Content-Type", value: "application/json" }];
    const receipt = await irysUploader.upload(JSON.stringify(dataToUpload), { tags });
    return receipt?.id || "";
  } catch (error) {
    console.error("Error uploading data: ", error);
    return "";
  }
}
Downloading Data from Irys
To retrieve your stored data, use the transaction ID returned at upload.
async function retrieveFromIrys(id: string): Promise<[string, string, object[]]> {
  const gatewayAddress = "https://gateway.irys.xyz/";
  const url = `${gatewayAddress}${id}`;

  try {
    const response = await fetch(url);
    if (!response.ok) throw new Error(`Failed to retrieve data for ID: ${id}`);
    const data = await response.json();

    return [data.cipherText, data.dataToEncryptHash, data.accessControlConditions];
  } catch (error) {
    console.error("Error retrieving data: ", error);
    return ["", "", []];
  }
}
Decrypting Data
Use the decryptToString() function to decrypt the data. This requires the ciphertext, its hash, access control conditions, and session signatures.
async function decryptData(
  ciphertext: string,
  dataToEncryptHash: string,
  accessControlConditions: object[]
): Promise<string> {
  const litNodeClient = await getLitNodeClient();

  const sessionSigs = await litNodeClient.getSessionSigs({
    chain: "ethereum",
    resourceAbilityRequests: [
      {
        resource: new LitAccessControlConditionResource("*"),
        ability: LIT_ABILITY.AccessControlConditionDecryption,
      },
    ],
    authNeededCallback: async (params: any) => {
      const toSign = await createSiweMessageWithRecaps({
        uri: params.uri,
        expiration: params.expiration,
        resources: params.resourceAbilityRequests,
        walletAddress: await (await new ethers.Wallet(process.env.PRIVATE_KEY!)).getAddress(),
        nonce: await litNodeClient.getLatestBlockhash(),
        litNodeClient,
      });

      return await generateAuthSig({
        signer: new ethers.Wallet(process.env.PRIVATE_KEY!),
        toSign,
      });
    },
  });

  const decryptedString = await LitJsSdk.decryptToString(
    {
      accessControlConditions,
      chain: "ethereum",
      ciphertext,
      dataToEncryptHash,
      sessionSigs,
    },
    litNodeClient
  );

  return decryptedString;
}
Next.js
When working with Lit in the browser, the private key will be linked via the user's wallet extension.
The full code for this example, including a complete UI, is available in the GitHub repository. This guide focuses on the functions which handle interactions with Lit Protocol and Irys, but does not cover how to build and setup a UI.
Installing
npm install \
  @lit-protocol/lit-node-client \
  @irys/web-upload \
  @irys/web-upload-ethereum \
  @irys/web-upload-ethereum-ethers-v6 \
  ethers
Connecting to Lit Protocol
Connect to a Lit node on one of our active networks. Choose between Datil (mainnet), Datil-test (testnet), and Datil-dev (development). For this example, we'll use DatilDev as use is free and not rate-limited.
import * as LitJsSdk from "@lit-protocol/lit-node-client";
import { LitNodeClient } from "@lit-protocol/lit-node-client";
import { LIT_NETWORK } from "@lit-protocol/constants";

const litNodeClient = new LitNodeClient({
  litNetwork: LIT_NETWORK.DatilDev,
});

await litNodeClient.connect();
Setting Access Control Rules
Access control rules determine who can decrypt your data. Set conditions based on criteria like ETH or ERC20 balance, NFT ownership, or custom logic.
// Allow users with ≥ 0 ETH:
function getAccessControlConditions(): object[] {
  return [
    {
      contractAddress: "",
      standardContractType: "",
      chain: "ethereum",
      method: "eth_getBalance",
      parameters: [":userAddress", "latest"],
      returnValueTest: {
        comparator: ">=",
        value: "000000000000000000", // 0 ETH in wei
      },
    },
  ];
}
// Allow users with ≥ 100 DAI:
function getAccessControlConditions(): object[] {
  return [
    {
      contractAddress: "0x6B175474E89094C44Da98b954EedeAC495271d0F", // DAI contract
      standardContractType: "ERC20",
      chain: "ethereum",
      method: "balanceOf",
      parameters: [":userAddress"],
      returnValueTest: {
        comparator: ">=",
        value: "100000000000000000000", // 100 DAI in wei
      },
    },
  ];
}
// Allow users owning any NFT from a contract
function getAccessControlConditions(): object[] {
 return [
   {
     contractAddress: "0xABC123...XYZ", // ERC721 contract address
     standardContractType: "ERC721",
     chain: "ethereum",
     method: "balanceOf",
     parameters: [":userAddress"],
     returnValueTest: {
       comparator: ">",
       value: "0",
     },
   },
 ];
}
For more advanced examples, see unified access control conditions.
Encrypting Data
We provide multiple methods to encrypt data, including strings, files, zip files.
encryptString():Encrypts a string.encryptFile(): Encrypts a file.encryptUint8Array(): Encrypts a Uint8Array, which can be a compressed file.encryptToJson(): Encrypts a string or file and serializes the result to JSON.
We will use encryptString() to encrypt a string:
export const encryptString = async (text: string): Promise<{ ciphertext: string; dataToEncryptHash: string }> => {
  await litClient.connect();

  const accessControlConditions = getAccessControlConditions();

  const { ciphertext, dataToEncryptHash } = await LitJsSdk.encryptString(
    {
      accessControlConditions,
      dataToEncrypt: text,
    },
    litClient
  );

  console.log({ ciphertext, dataToEncryptHash });
  return { ciphertext, dataToEncryptHash };
};
The encryptString() function encrypts your data according to the specified access control conditions, and returns:
ciphertext: The encrypted string.dataToEncryptHash: The hash of the original string, ensuring data integrity.
Storing Data on Irys
When storing encrypted data on Irys, store it as JSON objet with three components:
ciphertext: The encrypted version of your data.dataToEncryptHash: A hash of the original data, which helps verify its integrity during decryption.accessControlConditions: The rules governing who can decrypt the data.
Start by connecting to Irys:
The following code is for using Ethereum only, Irys also has examples covering all supported tokens.
import { Uploader } from "@irys/upload";
import { Ethereum } from "@irys/upload-ethereum";

const getIrysUploader = async () => {
  const irysUploader = await Uploader(Ethereum).withWallet(process.env.PRIVATE_KEY);
  return irysUploader;
};
Then upload your the JSON object:
export const uploadToIrys = async (cipherText: string, dataToEncryptHash: string): Promise<string> => {
  const irysUploader = await getIrysUploader();

  const dataToUpload = {
    cipherText: cipherText,
    dataToEncryptHash: dataToEncryptHash,
    accessControlConditions: getAccessControlConditions(),
  };

  try {
    const tags = [{ name: "Content-Type", value: "application/json" }];
    const receipt = await irysUploader.upload(JSON.stringify(dataToUpload), { tags });
    return receipt?.id ? `${gatewayAddress}${receipt.id}` : "";
  } catch (error) {
    console.error("Error uploading data: ", error);
    throw error;
  }
};
Downloading Data from Irys
To retrieve your stored data, you can use the transaction ID returned during the upload.
export const downloadFromIrys = async (id: string): Promise<[string, string, object[]]> => {
  const url = `${gatewayAddress}${id}`;

  try {
    const response = await fetch(url);
    if (!response.ok) throw new Error(`Failed to retrieve data for ID: ${id}`);
    const data = await response.json();

    const ciphertext = data.cipherText;
    const dataToEncryptHash = data.dataToEncryptHash;

    return [ciphertext, dataToEncryptHash, data.accessControlConditions];
  } catch (error) {
    console.error("Error retrieving data: ", error);
    return ["", "", []];
  }
};
Decrypting Data
Use the decryptToString() function to decrypt the data. This requires the ciphertext, its hash, access control conditions, and session signatures.
export const decryptData = async (encryptedText: string, dataToEncryptHash: string): Promise<string> => {
  await litClient.connect();

  const provider = new ethers.BrowserProvider(window.ethereum);
  const signer = await provider.getSigner();
  const walletAddress = await signer.getAddress();

  const latestBlockhash = await litClient.getLatestBlockhash();

  const authNeededCallback = async (params: any) => {
    if (!params.uri) throw new Error("uri is required");
    if (!params.expiration) throw new Error("expiration is required");
    if (!params.resourceAbilityRequests) throw new Error("resourceAbilityRequests is required");

    const toSign = await createSiweMessageWithRecaps({
      uri: params.uri,
      expiration: params.expiration,
      resources: params.resourceAbilityRequests,
      walletAddress: walletAddress,
      nonce: latestBlockhash,
      litNodeClient: litClient,
    });

    const authSig = await generateAuthSig({
      signer: signer,
      toSign,
    });

    return authSig;
  };

  const litResource = new LitAccessControlConditionResource("*");

  const sessionSigs = await litClient.getSessionSigs({
    chain: "ethereum",
    resourceAbilityRequests: [
      {
        resource: litResource,
        ability: LIT_ABILITY.AccessControlConditionDecryption,
      },
    ],
    authNeededCallback,
  });

  const decryptedString = await LitJsSdk.decryptToString(
    {
      accessControlConditions: getAccessControlConditions(),
      chain: "ethereum",
      ciphertext: encryptedText,
      dataToEncryptHash,
      sessionSigs,
    },
    litClient
  );

  return decryptedString;
};
Getting Help
Any questions? Reach out the Irys team in their Discord.
Not finding the answer you're looking for? Share your feedback on these docs by creating an issue in our GitHub Issues and Reports repository or get support by visiting our Support page.